
The term “yoga” in the Western world often denotes a modern form of Hatha yoga and a posture-based physical fitness, stress relief and relaxation technique, consisting largely of asanas; this differs from traditional yoga, which focuses on meditation and release from worldly attachments. It was introduced by gurus from India after the success of Swami Vivekananda’s adaptation of yoga without asanas in the late 19th and early 20th centuries Vivekananda introduced the Yoga Sutras to the West, and they became prominent after the 20th-century success of hatha yoga.
If These 05 Yoga Poses Aren’t Already a Part of Your Home Practice, They Should Be
Home practice is hard. It’s only human to go through phases where you get distracted by the shiny new challenge posed to try—or, on the opposite end of the spectrum, simply getting stuck in your favorite feel-good sequence. While you definitely don’t want to lose sight of goals or the sweet sensations that keep you coming back to your mat, it’s a good idea to take a critical eye to your practice now and then and look for the areas where you could strive for greater balance.
That’s what yoga is all about after all, and practitioners of every level can benefit from going back to basics regularly to reexamine the actions and alignment of foundational standing poses, backbends, forward bends, and inversions. So, I’ve compiled a list of poses that really stand the test of time—that is, 10 asanas every single yogi should be practicing on the regular. Here’s what made my list, along with focus tips for beginner, intermediate, and advanced practitioners.
Malasana (Garland Pose)
This beautiful squat is one of my all-time favorite poses. Malasana releases the lower back, opens the hips, and turns the practitioner into a cute little nugget. Explore variations and tips on how to make this pose easier or how to go deeper.

Beginner
It’s common for beginners to struggle with dropping their heels to the ground. Make sure to spin your heels in and toes out, as well as to widen your stance. If it irritates your knees to drop into a full squat, sit on one or more blocks.
Intermediate
Step up the hip-opening element of this pose by incorporating your arms. Lean forward to wiggle your upper arms to the inside of your legs. Draw your palms together in front of your heart and push your heart into your thumbs. This will naturally encourage external rotation and give you that extra moment.
Advanced
Full Malasana is traditionally performed with the feet together, knees wide, and the torso in a forward fold with either the ahhh arms extending or wrapped behind the heels.differs from traditional yoga You typically see this pose done with feet wider than the hips (which is still my personal favorite to release my back and hips after a long day).
Chaturanga Dandasana (Four-Limbed Staff Pose)
Chaturanga is one of the most common postures in Vinyasa yoga—but also one of the most abused. Students tend to rush this pose, cheating its alignment, which with repetition can lead to injury. Check out my pointers below to revisit this foundational posture and begin treating it as its own pose instead of a transition.

Beginner
Many people don’t have the strength and/or body awareness to perform this posture with good alignment. I recommend most students learn this pose with their knees down. Focus on drawing the lower belly up to prevent dumping in the lower back. Keep your elbows tight to your ribcage and stacked above your wrists.
Intermediate
Have the eye of the tiger! Gaze forward the entire time to prevent rounding in the upper back (we always want to look down here, look forward!) Draw the shoulder heads back and focus on extending your heart as you lower so the elbows stay over the wrists instead of falling behind the heels of your hands.
Advanced
Use full breath! People love to fly through this pose. Take a full inhale in Plank and a full exhale to come into Chaturanga. Don’t transition out of it until your exhale is complete. This takes control, awareness, and prevents you from making silly mistakes and moving too quickly.
Utthita Trikonasana (Extended Triangle Pose)
Trikonasana. Such a classic standing pose! We live in a world where standing poses are often ignored, but this one is part of my regular practice come rain or shine. It is a glorious way to release your lower back, strengthen your core, and expand your body (and mind).
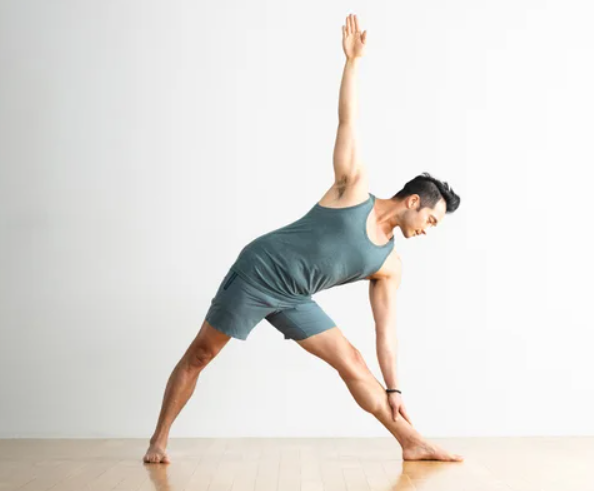
Beginner
Students tend to collapse their lower body trying to get their hand or palm to the ground. Skip that step and place your palm either on a block outside of your shin or on your shin below your knee. This enables you to even out through both sides of your ribcage creating even length in the trunk of your body.
Intermediate
It’s so easy to get sassy in this pose! Most people stick out their butts (pitch in their lower backs) and puff their ribs. Focus on corseting your ribcage in (wrapping the bones towards your midline) and keeping your lower belly engaged and lifted to create space in your lower back.
Advanced
The final step is taking both of these tips and looking down. You want to line your torso up with your front leg (most students lean toward the inside). Can you keep both sides of your waist even, ribs in, belly engaged and lower back long as you lean back? Of course, you can! Practice, practice, practice.
Crescent Lunge

I can’t imagine a Yoga practice without this perfect standing pose. Crescent Lunge is my go-to for opening my hips and psoas, encouraging space in my chest, and feeling powerful on my feet. Yoga practice without this perfect standing pose
Beginner
You’ll see newer students struggling for balance in this pose. Easy fix. Look down. Odds are your feet are too narrow. Make sure your front and back feet are hip-width apart. This will widen the stance and allow you to balance.
Intermediate
There’s a tendency to lean forward in this pose which is often caused by pitching in your lower back or tightness in the psoas connected to your back leg. Bend your back knee as much as you need to for mobility in your pelvis. Draw the front crest of your pelvis up to neutral (like a bowl full of kombucha that you don’t want to spill) and gently draw your back leg toward straight. It may not fully straighten, but this is a stronger posture.
Advanced
Try adding the element of a backbend/drop back in your upper body. Follow the rules you’ve read so far and then reach your arms overhead interlacing all the fingers except for your thumb and index. Keep the base of the neck relaxed as you lift your heart up and curl your upper chest. Draw an imaginary line along the ceiling going up and back. Keep the base of your building strong, aka don’t pitch your pelvis.
Salamba Sirsasana II (Supported Headstand)
Inversions are a magical group of postures that reverses our perspective and give us a strong dose of empowerment. Tripod Headstand is one of the easier inversions to balance because of the large foundation. It’s also fantastic to understand if you want to move into advanced transitions such as lowering into arm balances.
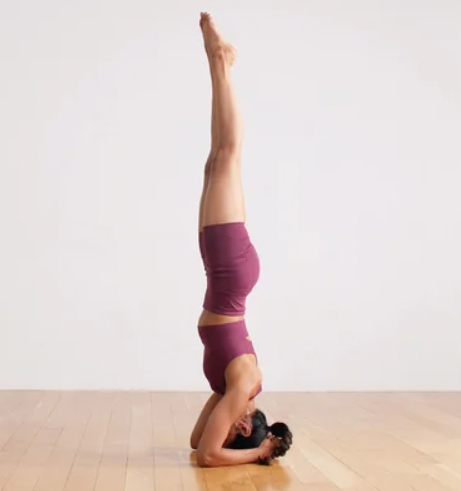
Beginner
Place the crown of your head on the ground with your hands shoulder-width apart and elbows stacking over the heels of your hands. Curl your toes under and straighten your legs to enter a Dolphin Pose. Focus on keeping the elbows in (engage your adductors) and draw your shoulders up away from the ground to prevent collapsing into your neck. Try walking your feet in without losing these actions.
Intermediate
Keep the same actions as above, but as you gain flexibility, walk your feet in enough so you can place one knee at a time onto the back of your arms (aim closer to the armpits if possible). Again, keep the elbows in and shoulders up to prevent collapsing your arms from the weight of your legs.
Advanced
From the knee position draw them up off of your arms and into your chest like a cannonball. Continue to draw the legs up until they straighten out, keeping the legs hugging into the midline the entire time. You can also enter this posture from Dolphin walking your feet in, keeping the legs straight, and entering from a press.